How to Run Packer Pipelines on Jenkins: Part 1 - Traditional Jenkins
Share on:Blog Series: How to Run Packer Pipelines on Jenkins
In my day job, I’ve had to setup Packer Pipelines on Jenkins multiple times for multiple clients. That’s when I learned that not every Jenkins setup is the same, so I created the How to Run Packer Pipelines on Jenkins blog series where you will learn how to setup a Packer Pipeline in the most common Jenkins configurations. Here is the list of all the blogs in the series.
- How to Run Packer Pipelines on Jenkins: Part 1 - Traditional Jenkins (this post)
- How to Run Packer Pipelines on Jenkins: Part 2 - Jenkins in Docker
- COMING SOON: How to Run Packer Pipelines on Jenkins: Part 3 - Jenkins in Kubernetes.
Why you need Packer Pipelines on Jenkins
Have you tried using Packer to create Operating System (OS) templates? Don’t you hate how do you need to keep your laptop unlocked and it takes forever to run?
While it is easy to run Packer on your workstation to create OS templates, it usually takes a long time to run. That’s why it is best to use Packer inside of an automation server such as Jenkins, on a separate machine.
In this blog entry, you will learn how to setup a Packer Pipeline in a traditional Jenkins installation.
How to integrate Jenkins with Packer
No matter what Jenkins configuration you have, you can integrate Jenkins with Packer using the following 5 steps:
- Install Jenkins.
- Install Packer binary on Jenkins node or Jenkins agent.
- Write Packer and Jenkins Pipeline code and put it in a Git repository.
- Setup Jenkins Pipeline Job using Pipeline code from Git repository.
- Run pipeline.
The details will vary based on your configuration but they will follow the same principles.
Run Packer Pipelines Inside Traditional Jenkins Installation
This blog will focus on the simplest, though perhaps not the most robust, installation of Jenkins. This is how most people will likely be introduced to Jenkins, so it makes sense to start here. The following is a diagram describing what we are trying to setup:
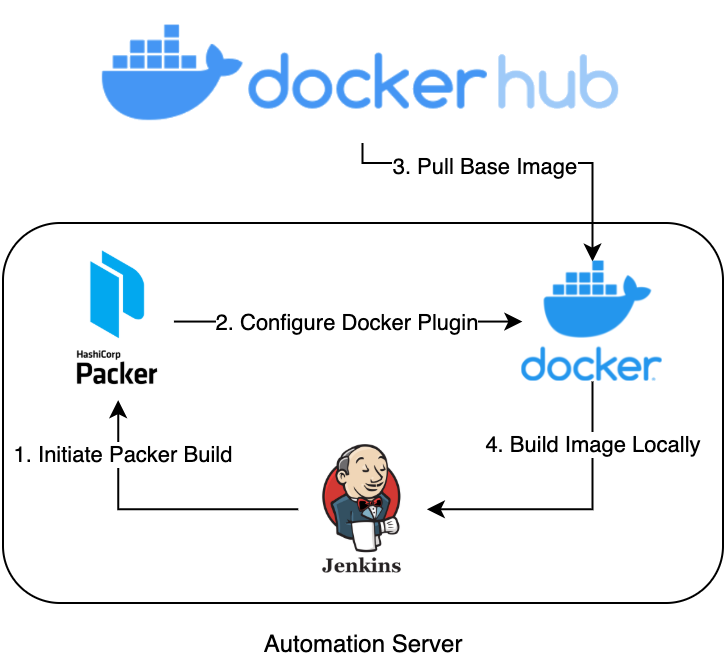
Jenkins Pipeline Diagram
Basically, in the same machine, we will be installing Jenkins, Packer, Docker, and run the Jenkins Pipeline that will use Packer to create a container image with Docker. You can do this in your own workstation or on a separate VM or server.
Now, to install everything that we need, click on the links below and follow the instructions for your platform:
a. Packer Code Explained
NOTE: All the code that we will be using today is in my github.com/fabiogomezdiaz/packer-pipelines GitHub repo. So you can follow along or try to replicate this yourself.
Instead of building a Virtual Machine (VM) template, we will be using Packer to build a container image using Docker. We use Docker instead of a Cloud Provider (AWS, Azure, or GCP) account because Docker is free and can be downloaded in your workstation. Besides, the same Packer principles apply to building Docker Images as to building VM images.
The Packer code that we will be using here is from the Packer - Docker - Build an Image Tutorial. Here is the code:
packer {
  required_plugins {
    docker = {
      version = ">= 0.0.7"
      source = "github.com/hashicorp/docker"
    }
  }
}

source "docker" "ubuntu" {
  image  = "ubuntu:xenial"
  commit = true
}

build {
  name    = "learn-packer"
  sources = [
    "source.docker.ubuntu"
  ]
}
Here is a quick breakdown of what it does:
- The
packerblock is to configure packer-specific settings.- In this case, we need to specify that we will be using the
dockerplugin. - See Packer block documentation for more details.
- In this case, we need to specify that we will be using the
- The
sourceblock in this case is used to configure thedockerbuilder plugin.- In our case, the Docker builder configuration creates a new Docker image using
ubuntu:xenialas the base image, then commits the container to an image locally. - See Source block documentation for more details.
- In our case, the Docker builder configuration creates a new Docker image using
- Lastly, the
buildblock defines what Packer should do with the Docker container after it launches, which in our case, it does nothing other than provide a reference to the image defined in thesourceblock.- See Build block documentation for more details.
b: Packer Pipeline Explained
Now that we have everything setup, let’s take a look at the Jenkinsfile.groovy file, which contains the pipeline code that will be used in Jenkins:
pipeline {
  agent any

  stages {
    stage('Packer - Build Ubuntu Image on vSphere') {
      steps {
        sh """
        #!/bin/bash
        cd jenkins-tutorial
        packer init .
        packer build -force .
        """
      }
    }
  }
}
Basically, it does the following:
- Initializes Packer and installs the
dockerplugin. - Runs the Packer build.
- Verifies that the
ubuntu:xenialimage was created.
Now that we understand both the Packer and the Jenkins Pipeline code, let’s move on to configuring Jenkins and actually running the pipeline.
c: Setting up Packer Pipeline on Jenkins
Now, open Jenkins, login, and do the following:
- Click
New Item, then enterpacker-docker-pipelinefor item name, selectPipeline, then clickOK.
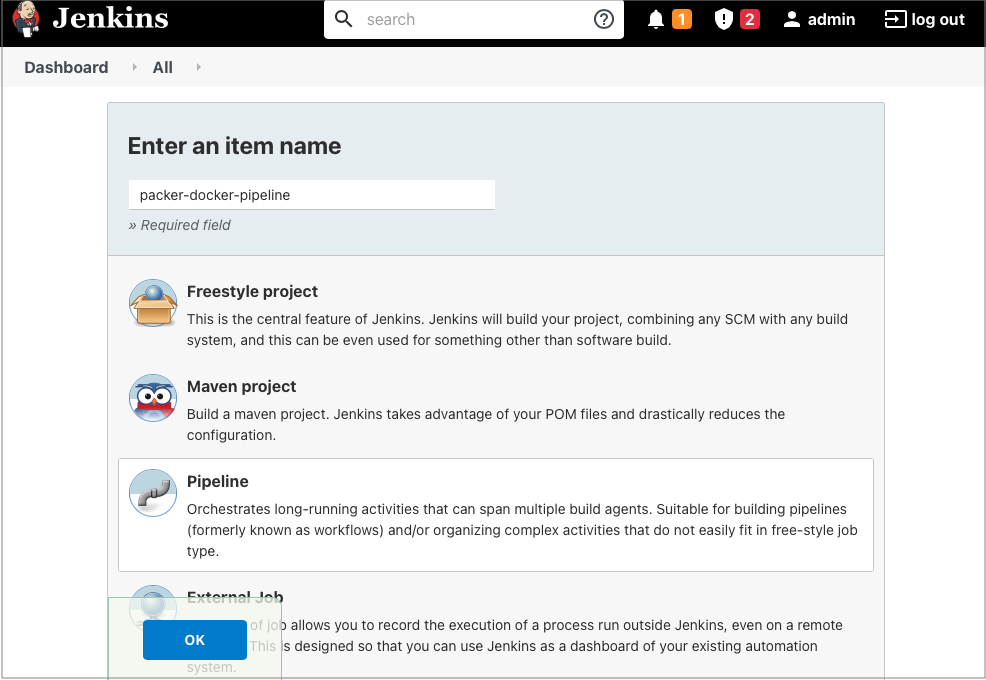
Creating Jenkins Pipeline
- On the new Job configuration page, click
Pipelinetab and then enter the following values:- Definition:
Pipeline script from SCM. - SCM:
Git. - Repository URL:
https://github.com/fabiogomezdiaz/packer-pipelines.git. - Branch Specifier:
main. - Script Path:
jenkins-tutorial/1-Jenkinsfile.groovy. - Click
Save.
- Definition:
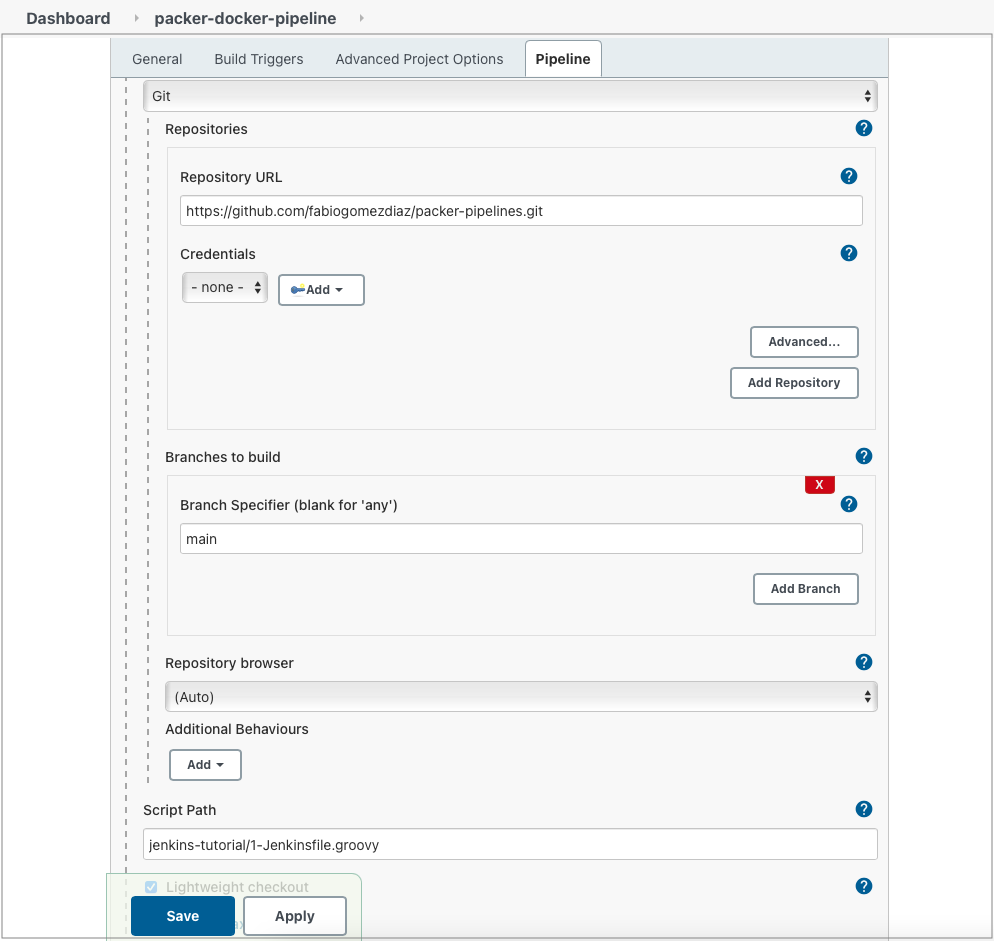
Configuring Jenkins Pipeline
d: Running the Packer Pipeline
Now that everything is ready, go ahead and click on Build Now, to trigger the pipeline.
Then, click the Job Number (i.e. #1), then click on Console Output to see the job logs.
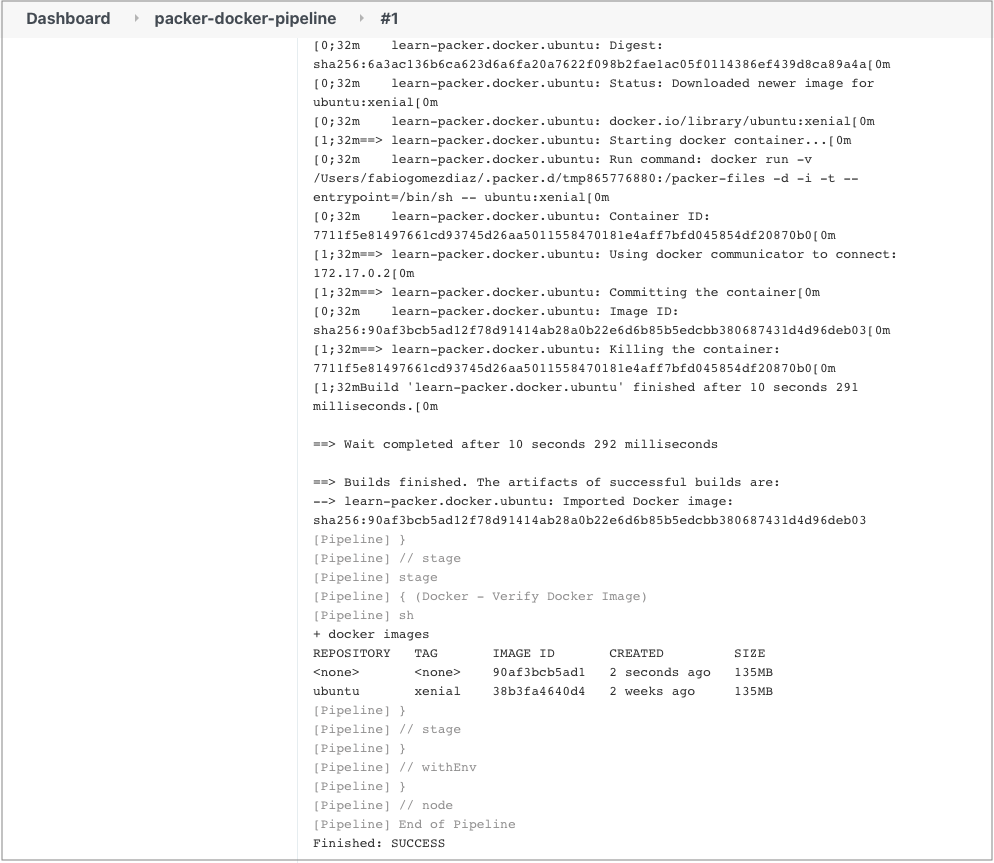
Pipeline Logs
If you see the ubuntu image with the xenial tag, as shown above, then, CONGRATULATIONS!!! You have successfully used Jenkins to build a Container Image for Docker using Packer!!!
e: (Optional) Fix command not found error on Jenkins on macOS
If you are using Jenkins on macOS, you may be getting the packer: command not found or docker: command not found. This means that the PATH variable in Jenkins is not including /usr/local/bin which is where both packer and docker are normally installed.
To fix the error, we need to update the PATH environment variable and add the /usr/local/bin folder, which you can do as follows:
- Open Jenkins Dashboard and go to
Manage Jenkins -> Configure System - Scroll Down to Global properties and tick the Environment variables box.
- Click the Add button twice and enter the following environment variables:
- Variable 1
- Name:
USR_LOCAL_BIN - Value:
/usr/local/bin
- Name:
- Variable 2
- Name:
PATH+USR_LOCAL_BIN - Value:
${USR_LOCAL_BIN}
- Name:
- Variable 1
- Click
Save.
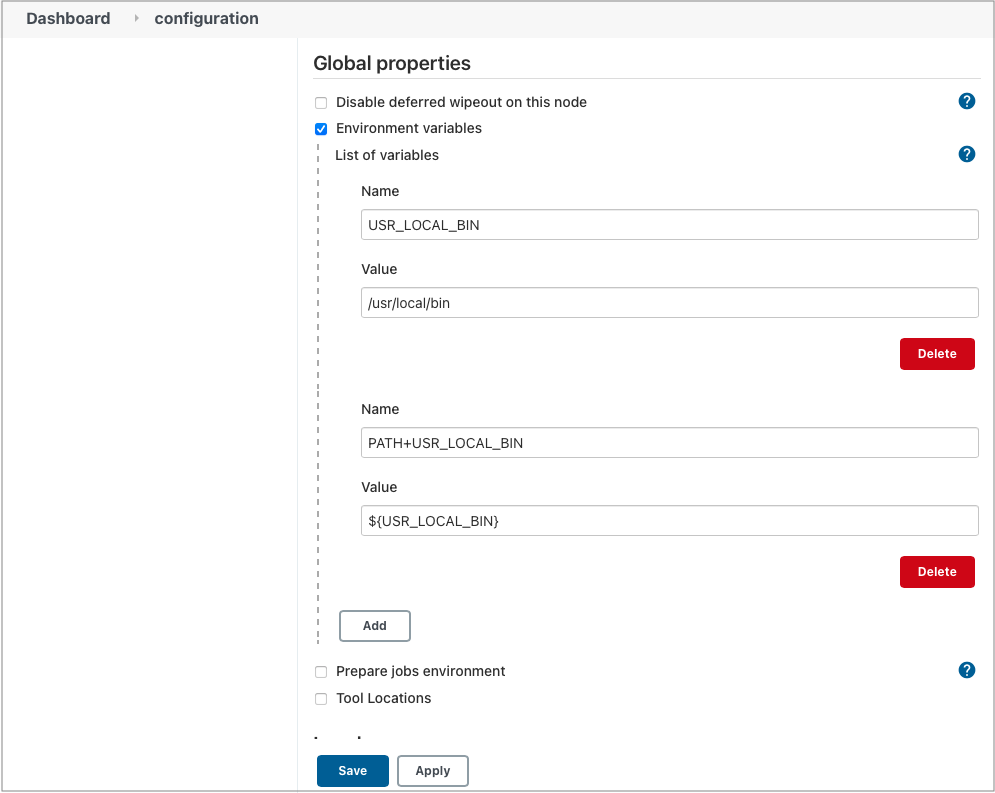
Updating PATH Variable
Now, if you try building the pipeline again, the job will be able to find both the packer and docker binaries and be able to run both commands successfully.
Conclusion
Now that you have setup a Packer Pipeline inside Jenkins, you should be able to write pretty much any Packer code and build images using the pipeline you ran today with minor modifications.
Now, installing and setting up Jenkins and Jenkins nodes is a pretty manual process. If you mess it up, you have start over from scratch, which is a time consuming process. In Part 2 of the How to Run Packer Pipelines on Jenkins blog series, we teach you how to deploy Jenkins with Docker, which can save you lots of time and headaches.