How to Run Packer Pipelines on Jenkins: Part 2 - Jenkins in Docker
Share on:Blog Series: How to Run Packer Pipelines on Jenkins
This is Part 2 of the How to Run Packer Pipelines on Jenkins series of blogs that started with the following entry:
- How to Run Packer Pipelines on Jenkins: Part 1 - Traditional Jenkins
- How to Run Packer Pipelines on Jenkins: Part 2 - Jenkins in Docker (this post)
- COMING SOON: How to Run Packer Pipelines on Jenkins: Part 3 - Jenkins in Kubernetes.
Also, this blog entry is based on the great documentation work done by the Jenkins community, which you can reference here:
Why you need Packer Pipelines on Dockerized Jenkins
Have you tried installing Jenkins before? It’s all nice and easy until you have to install, upgrade, and maintain Jenkins plugins and Jenkins itself. If you do something wrong, you have to not only reinstall Jenkins but setup/maintain/upgrade the plugins AND pipelines as well.
There has to be an easier way, right? Well, enter Jenkins in Docker!!!
If you used Docker before, you know that you can create a Dockerfile to package pretty much any application and its dependencies.
Well, the folks at the Jenkins Community have done just that! And you can even extend their Dockerfile and include any custom plugin you like (more on that later)! If something goes wrong, you can just kill the container and redeploy it again, and you will be back to where you were in seconds instead of hours!!!
Now, to take it to the next level, you can even setup your own containerized jenkins agents that will contain all the tools you need to run your pipelines rather than having to configure that in Jenkins directly!
Anyways, you can tell that I am really excited about this so I will explain how to deploy a Containerized Jenkins and your own Containerized Jenkins Agents right below.
How to integrate Jenkins with Docker
Now there are multiple ways to do this (like anything with software) but the best way I could find is as follows:
- Install Docker.
- Deploy a Docker-in-Docker container to host containerized Jenkins Agents.
- Deploy Jenkins container and connect to Docker-in-Docker container.
- Create containerized Packer and Docker Jenkins agent.
- Create Packer Pipeline code and put it in a Git Repository.
- Setup Jenkins Pipeline Job using Git repository.
- Run pipeline.
I will explain each step in details, but here are some of the key advantages of this approach:
- Increased security: Using a Docker-in-Docker container to host Jenkins agents instead of the host’s Docker engine can prevent a rogue container from taking over the host’s Docker engine.
- Reduced compute resources: Contanerized Jenkins agents are ephemeral, which means they are only deployed when they are needed and destroyed when they are no longer needed.
- Repeatable infrastructure: Because all the moving parts are containerized, you can redeploy any of your Jenkins pipeline infrastructure in seconds and know exactly what’s in it. No more guessing and no more manual work!
- Faster deployment times: Because you are using containers to deploy and run all your pipeline infrastructure, you can get to deploy your first pipeline faster than the manual approach, even if you have to start again from scratch.
Run Docker Packer Pipelines inside Dockerized Jenkins
Now, this approach of running Jenkins is perhaps the easiest to do as long as you have Docker installed in your machine. Let’s take a look in in the diagram below to get a visual of what we are about to deploy:
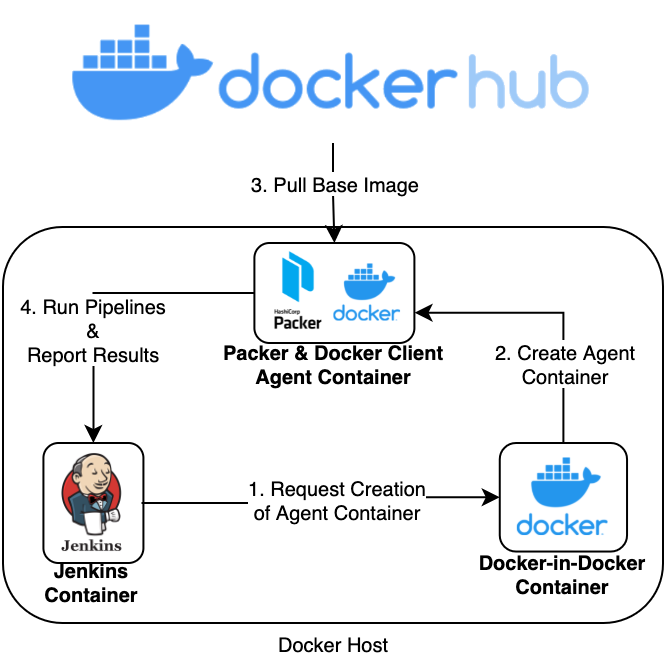
Jenkins in Docker Pipeline Diagram
Here is a breakdown:
- All components will be deployed using Docker in the same machine/host.
- A Docker-in-Docker container will be deployed to manage containerized Jenkins Agents.
- A Jenkins container will be deployed in the host Docker engine and connected to the Docker-in-Docker container.
- For a pipeline to run, Jenkins needs to tell the Docker-in-Docker container to deploy the Jenkins Agent container, which includes Packer and a Docker client that will communicate with the Docker-in-Docker container to build container images.
- Any base images (
ubuntu:xenialin our case) will be downloaded from Docker Hub.
I hope all the different Docker variations didn’t make your head hurt. It’s actually a simple and robust architecture once you get over the initial learning curve and it will be hard to go back.
Now, to get started, the only thing you will need to install in your host is Docker, which you can do following the instructions linked below:
That’s it because everything can be deployed using container images.
a. (Optional) Create a Git Repository
All resources that we will be deploying today will come from files that we create in a Git repository. If you want to run all the steps in this guide yourself, I suggest that you do the following:
- Create a GitHub Account
- Clone the public git repository for this blog:
NOTE: In the following sections, you will learn how to create all the files in the repo yourself, but it is OPTIONAL to do so.
b. (Optional) Login to Docker Hub
NOTE: This step is optional because you can just use the following images I published on Docker Hub:
If you want to build and publish your own Jenkins in Docker and Packer and Docker Jenkins Agent images, then I suggest you do the following:
- Create an account at Docker Hub.
- Create a Docker Hub Access Token.
- This step is suggested for automation servers and production use.
To login to Docker Hub, run the following command:
docker login
Then enter your username and password (or access token). If login was successful, then you are good to go!
c. Deploy Docker-in-Docker Container
Now that we know what we need to do, let’s go ahead and deploy the Docker-in-Docker container, starting with the following command, which creates the jenkins network in Docker:
docker network create jenkins
This network will be dedicated to Jenkins, the Docker-in-Docker, and the Jenkins agent containers.
Now let’s deploy the Docker-in-Docker container using the following command:
docker run --name jenkins-docker --rm --detach \
  --privileged --network jenkins --network-alias docker \
  --env DOCKER_TLS_CERTDIR=/certs \
  --volume jenkins-docker-certs:/certs/client \
  --volume jenkins-data:/var/jenkins_home \
  --publish 2376:2376 docker:dind --storage-driver overlay2
Let’s break down the most relevant parts of this command:
- The –privileged flag is required to run Docker-in-Docker properly and deploy containers on the
jenkinsnetwork. - The –network jenkins flag makes sure we are using the
jenkinsnetwork. - The –network-alias docker makes it possible to reference Docker-in-Docker container (which we named
jenkins-docker) as simplydockerwithin thejenkinsnetwork. - The –volume flags map the
/certs/clientand/var/jenkins_homedirectories inside the container to thejenkins-docker-certsandjenkins-dataDocker volumes, respectively.- This will allow for other Docker containers controlled by this Docker container’s Docker daemon to mount data from Jenkins.
NOTE: For more details, please reference the documentation here:
To verify that the Docker-in-Docker container is running, use the following command:
docker ps
If you see a container with the name jenkins-docker with an image of docker:dind and a status of Up, then you are good to go!
Lastly, let’s obtain the IP address of Docker-in-Docker container, which we are going to use in a later step:
docker inspect -f \
  '{{range .NetworkSettings.Networks}}{{.IPAddress}}{{end}}' \
  jenkins-docker
Copy the above output, because we are going to use it in the f. Setting up Packer Pipeline on Jenkins section.
d. Dockerfile for Jenkins with Docker
This is the part where we build a custom container for Jenkins that includes the Docker Pipelines plugin (docker-workflow), the Docker CLI, and other useful tools like curl.
NOTE: Going through this section is optional because I have the same exact image built and published on Docker Hub, which you can use pull using docker pull fabiogomezdiaz/jenkins-with-docker:latest.
To build your own custom Jenkins container, first create a file called Dockerfile then copy and paste the content below into it, then save it:
FROM jenkins/jenkins:2.289.3-lts-jdk11
USER root
RUN apt-get update && apt-get install -y apt-transport-https \
       ca-certificates curl gnupg2 \
       software-properties-common
RUN curl -fsSL https://download.docker.com/linux/debian/gpg | apt-key add -
RUN apt-key fingerprint 0EBFCD88
RUN add-apt-repository \
       "deb [arch=amd64] https://download.docker.com/linux/debian \
       $(lsb_release -cs) stable"
RUN apt-get update && apt-get install -y docker-ce-cli
USER jenkins
RUN jenkins-plugin-cli --plugins "docker-workflow:1.26"
To build the container, run the following command:
# Build container
docker build -t jenkins-with-docker:latest .

# Verify the container image was created
docker images | grep "jenkins-with-docker"
If you see the jenkins-with-docker image listed in the output of the last command above, then you built your image successfully!
f. Start Jenkins with Docker
Now, this is where we get to deploy Jenkins. Again, you don’t have to use the image you built and, instead, can use the image I built and published to Docker Hub as fabiogomezdiaz/jenkins-with-docker:latest.
Here is the command to deploy Jenkins with Docker:
docker run \
  --name jenkins-with-docker \
  --rm \
  --detach \
  --network jenkins \
  --env DOCKER_HOST=tcp://docker:2376 \
  --env DOCKER_CERT_PATH=/certs/client \
  --env DOCKER_TLS_VERIFY=1 \
  --publish 8080:8080 \
  --publish 50000:50000 \
  --volume jenkins-data:/var/jenkins_home \
  --volume jenkins-docker-certs:/certs/client:ro \
  jenkins-with-docker:latest
Now, wait a minute or so to let the Jenkins container start. Then retrieve the initial admin password using the following command:
docker exec jenkins-with-docker cat /var/jenkins_home/secrets/initialAdminPassword
Now open your browser to localhost:8080 or IP_ADDRESS:8080, enter the password you obtained above, then proceed with installing Jenkins. There is no need to install additional plugins (unless you forgot to add them in the Dockerfile) or create additional users (though it’s best practice to do so for production deployments).
g. Dockerfile for Packer and Docker Jenkins Agent
Now let’s create a container image for the Jenkins agent that will include Packer and Docker client. This is the image that will allow us to run the Packer and Docker commands to build a container image.
NOTE: Just like with the Jenkins container, creating your agent is optional because I published the same exact image on Docker Hub as fabiogomezdiaz/jenkins-agent-packer-docker:latest.
To build your own custom Jenkins Agent container, first create a file called Dockerfile-packer-docker-jenkins-agent then copy and paste the content below into it, then save it:
FROM docker:20.10
ENV PACKER_VERSION=1.7.4
ENV PACKER_SHA256SUM=3660064a56a174a6da5c37ee6b36107098c6b37e35cc84feb2f7f7519081b1b0

RUN apk add --update git bash wget openssl

ADD https://releases.hashicorp.com/packer/${PACKER_VERSION}/packer_${PACKER_VERSION}_linux_amd64.zip ./
ADD https://releases.hashicorp.com/packer/${PACKER_VERSION}/packer_${PACKER_VERSION}_SHA256SUMS ./

RUN sed -i '/.*linux_amd64.zip/!d' packer_${PACKER_VERSION}_SHA256SUMS
RUN sha256sum -cs packer_${PACKER_VERSION}_SHA256SUMS
RUN unzip packer_${PACKER_VERSION}_linux_amd64.zip -d /bin
RUN rm -f packer_${PACKER_VERSION}_linux_amd64.zip

ENTRYPOINT ["/bin/packer"]
On a high level, the Dockerfile above does the following:
- Uses the
docker:20.10image as a base image. - Downloads and installs
Packerversion 1.7.4. - Installs other utilities like
git,bash,wget, andopenssl.
To build the container, run the following command:
# Build container
docker build -f Dockerfile-packer-docker-jenkins-agent -t jenkins-agent-packer-docker:latest .

# Verify the container image was created
docker images | grep "jenkins-agent-packer-docker"
If you see the jenkins-agent-packer-docker image listed in the output of the last command above, then you built your image successfully!
Now, in order to use the image in the pipeline, you will need to publish this image to your Docker Hub account using the following command:
# Replace ${DOCKERHUB_USERNAME} with your own Docker Hub username
docker tag jenkins-agent-packer-docker:latest ${DOCKERHUB_USERNAME}/jenkins-agent-packer-docker:latest

# Publish to Docker Hub
docker push ${DOCKERHUB_USERNAME}/jenkins-agent-packer-docker:latest
h. Packer Pipeline Explained
NOTE: You don’t need to create the pipeline file as it is available in my repo here.
Now that we have all the pipeline infrastructure setup, let’s go ahead and look at our pipeline code below:
pipeline {
  agent {
    docker {
      image env.AGENT_DOCKER_IMAGE ?: 'fabiogomezdiaz/jenkins-agent-packer-docker:latest'
      args "--entrypoint='' -v /certs/client:/certs/client"
    }
  }

  environment {
    PACKER_CACHE_DIR = "${env.WORKSPACE_TMP}/.packer.d/packer_cache"
    PACKER_CONFIG_DIR = "${env.WORKSPACE_TMP}/.packer.d"
    PACKER_HOME_DIR = "${env.WORKSPACE_TMP}/.packer.d"
    PACKER_PLUGIN_PATH = "${env.WORKSPACE_TMP}/.packer.d/plugins"
    TMPDIR = "${env.WORKSPACE_TMP}"
    DOCKER_HOST = "tcp://${DOCKER_HOST_IP}:2376"
  }

  stages {
    stage('Packer - Build Docker Image') {
      steps {
        sh """
        #!/bin/sh
        cd jenkins-tutorial
        packer init .
        packer build -force .
        """
      }
    }
    stage('Docker - Verify Docker Image') {
      steps {
        sh """
        #!/bin/sh
        docker images
        """
      }
    }
  }
}
Now, this pipeline is very similar to the pipeline in Part 1 of this series but with a few differences. Here is a quick breakdown:
- The stages and steps are basically the same: build a docker image using Packer and then verify that it was created using
docker ps. - In the
agentblog we define a Jenkins agent of typedockerthat uses the container image for Packer and Docker Jenkins Agent, which we explained in the previous section.- The pipeline uses the image I published at fabiogomezdiaz/jenkins-agent-packer-docker:latest.
- However, you can create an environment variable called AGENT_DOCKER_IMAGE to use your Docker Hub image instead.
- Lastly, in the
environmentblock we use environment variables to tell Packer where to store its config, cache, and plugin files.- Also, we specify the IP address of the
Docker-in-Dockercontainer so that it can be used to build and verify that the Docker Image was built successfully.
- Also, we specify the IP address of the
Now that all the pipeline infrastructure is explained and setup. Let’s finally go ahead and setup the pipeline.
i. Setting up Packer Pipeline on Jenkins
Now, open Jenkins, login, and do the following:
- Click
New Item, then enterpacker-docker-agent-pipelinefor item name, selectPipeline, then clickOK.

Creating Jenkins Pipeline
- Now, lets setup the
DOCKER_HOST_IPenvironment variable by doing the following:- Click on This project is parameterized.
- Click on Add Parameter, then select String Parameter, and then enter the following values:
- Name:
DOCKER_HOST_IP. - Default Value: Set this to the IP Address you obtained in the c. Deploy Docker-in-Docker Container section.
- Name:
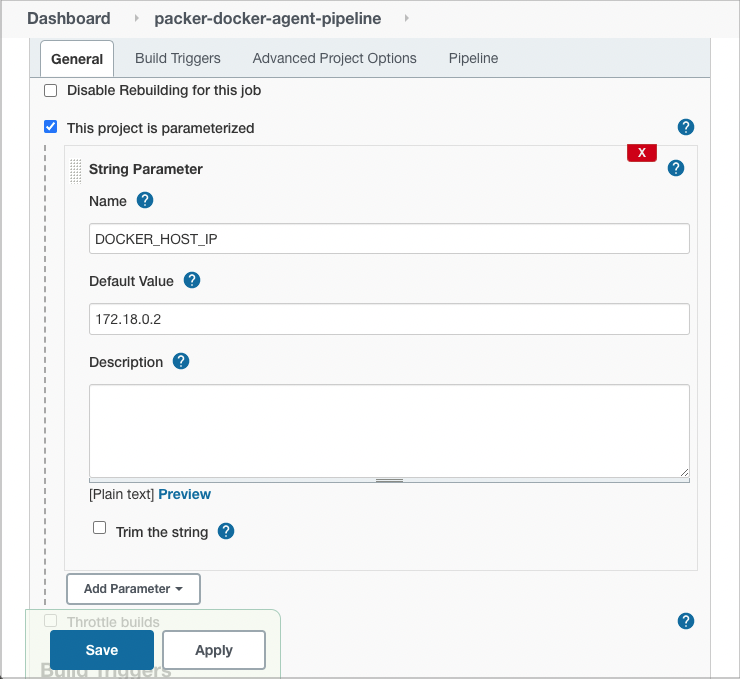
Setting up DOCKER_HOST_IP
- On the new Job configuration page, click
Pipelinetab and then enter the following values:- Definition:
Pipeline script from SCM. - SCM:
Git. - Repository URL:
https://github.com/fabiogomezdiaz/packer-pipelines.git. - Branch Specifier:
main. - Script Path:
jenkins-tutorial/2-Jenkinsfile-docker.groovy. - Click
Save.
- Definition:
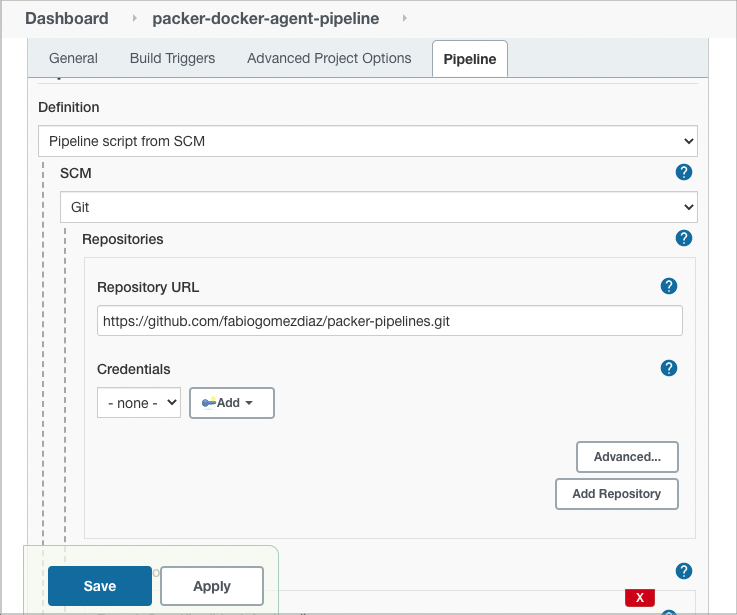
Configuring Git Repo

Setting up Jenkinsfile Path
j: Running the Packer Pipeline
Now that everything is ready, go ahead and click on Build Now, to trigger the pipeline.
Then, click the Job Number (i.e. #1), then click on Console Output to see the job logs.
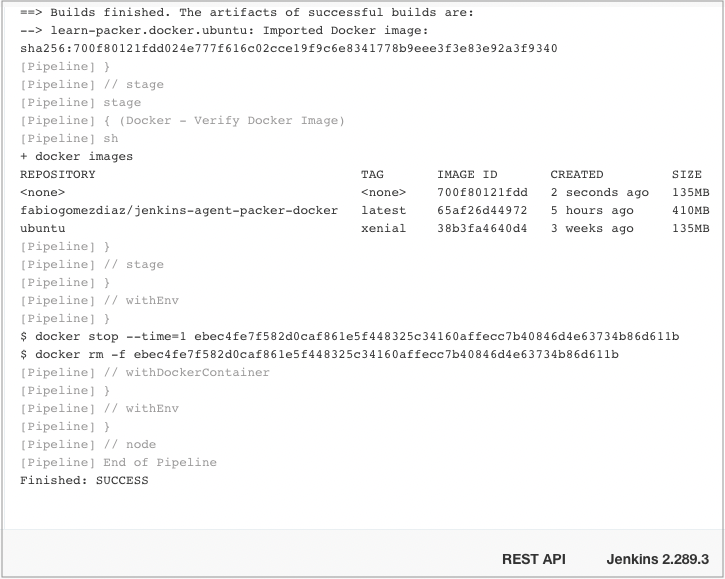
Pipeline Logs
If you see the ubuntu image with the xenial tag, as shown above, then, CONGRATULATIONS!!! You have successfully used Jenkins to build a Container Image for Docker using Packer!!!
Conclusion
If you reached the end of this blog entry, then CONGRATULATIONS!! You have successfully learnt how to setup and run Packer Pipelines on Jenkins deployed in Docker. Now you should be able to write pretty much any Packer code and build image templates using the pipeline you ran today with minor modifications.
Now, at some point you will create and run so many pipelines at the same time that you will be forced to create a Jenkins cluster with multiple VMs/hosts. Managing a Jenkins cluster can be a tedious task that can get in the way of creating more Jenkins pipelines. It is at this point that I suggest you start using Kubernetes to manage your Jenkins containers at scale.
With that in mind, in Part 3 of the How to Run Packer Pipelines on Jenkins blog series, we teach you how to deploy Jenkins with Kubernetes. This will save you tons of time and gets rid of having to manage a Dedicated Jenkins cluster to run Jenkins pipelines at scale.
- COMING SOON: How to Run Packer Pipelines on Jenkins: Part 3 - Jenkins in Kubernetes.